Quick Tips: Revive an old machine with Lubuntu

What would you do if you have a 10+ year old laptop that is but too old to run any version of Windows. Unless you can actually donate it or make use of it, most likely, it'll be lying there for too long. I had a similar situation, so, I thought of utilizing it for my hobby activities. Hereby I'm sharing some quick steps that you can also use to renew your old computer/laptop.

With these steps you can get a renewed laptop which feels snappier and powerful. As you may be familiar, with Linux, you get a much powerful operating system and access to mighty open source tools/applications.

Why Lubuntu

Lubuntu is arguably the most lightweight Linux for desktops and PCs. It uses as less as 500MB RAM and can work for a wide range of old processors. As its built on top of Ubuntu, the support for devices is extremely wide (probably widest) and is quite easy to install and use for beginners.

Pre-Requisites

Before getting started you would need:

  1. Laptop/Desktop with internet connection (in this case I'm using a windows laptop)
  2. USB Drive (at least 8 GB)
  3. Backup data from USB drive, as steps mentioned below will wipe everything out of the USB drive

Phase 1- Create a bootable USB drive (Estimated time: ~20 min)

It may be sounding quite techie, but it's not quite so. (So much for installing Linux via multiple floppy drives during old times).

  1. Download tool to create bootable USB drive
    1. Windows: Download Rufus from https://rufus.ie/
    2. Mac: Download Etcher from https://etcher.io/
  2. Download latest OS (ISO file) that you need for installation. In this case, I used Lubuntu, as it is a lighter version of widely used Ubuntu (lots of support and stability) and is easy to use for general population
    1. Lubuntu Downloads link: https://lubuntu.me/downloads/
    2. Download the version recommended for most users. Currently it is 22.04.03 (https://cdimage.ubuntu.com/lubuntu/releases/22.04.3/release/lubuntu-22.04.3-desktop-amd64.iso)
  3. Now, create the bootable USB Drive using the tool downloaded (steps can differ for tool, but generally follows):
    1. Open tool (Rufus / Etcher) downloaded earlier
    2. Select the OS installation ISO file downloaded in previous step
    3. Ensure USB drive is inserted into USB port (doesn't help if USB drive is in your pocket)
    4. Ensure the device selected indicates USB drive that's to be used
    5. You can leave rest of the the fields to their default value and proceed (refer to screenshot below for reference)
    6. Application should take a few minutes and confirm when USB drive is ready


Phase 2 - Boot Old Machine using USB Drive (Estimated time: ~10 min)

Now, this can get a bit tricky, but keep faith and proceed, you'll succeed.
  1. Take old laptop that needs second life
  2. Insert USB Drive (made bootable with previous steps) into USB port of the old laptop
  3. Boot old laptop
  4. If you directly see Lubuntu installation screen, then skip to step 4, else proceed with step 5
  5. You may need to change boot sequence
    1. Shutdown machine (if nothing works press power button for around 10-15 seconds)
    2. Restart machine, as soon as you see anything, start pressing BIOS shortcut key. Refer following list to identify BIOS menu shortcut key for your machine (If this doesn't work, try searching on Google for your specific machine) 
      1. Acer: Esc, F12 or F9. Most computers models from Acer should work with the F12 key.
      2. Asus: F8 or Esc
      3. Compaq: Esc or F9
      4. Dell: F12
      5. Fujitsu: F12
      6. HP: Esc or F9. If Esc works, you may need to press F9 afterwards: Esc + F9.
      7. Lenovo: F8, F10 or F12. On computer models with the Novo button, try pressing the Novo button. Other key combinations: Fn + F11.
      8. Samsung: Esc or F2 or F12. Users of ultrabooks from Samsung should disable the fast boot option in BIOS/UEFI before they boot from a USB device. To disable the fast boot, go to To access BIOS/UEFI > Samsung and find the combination of keys you need to press to access this.
      9. VAIO: Esc, F10 or F11. On some Sony VAIO computers models you may need to press the Assist button.
      10. Toshiba: F12
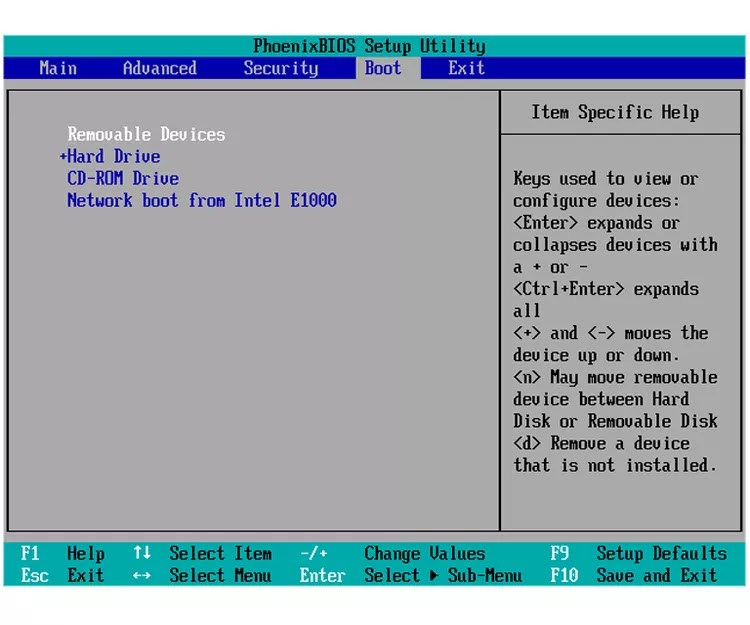
    3. Once in BIOS menu, locate Boot settings and ensure Removable devices is at the top (use arrow keys indicated on right hand side to move items up and down). It should look somewhat similar to screenshot below
Boot menu to boot from usb drive

Phase 3 - Install Lubuntu (Estimated time: ~30 min)

  1. Follow steps as per article: https://www.zdnet.com/article/how-to-install-linux-on-an-old-laptop/
  2. Voila! If everything went right, you should see a desktop similar to following screenshot


With this, you would find a renewed machine, which is snappy and resourceful. Linux may have a bit of learning curve for newbies, but it is nothing to be afraid of. Just give it a try, with some time, you'll love it.

Further

Well, my laptop had 3 GB of RAM, which was enough to run Lubuntu (taking only 600MB of RAM). However, I intended to use this machine as a CI job runner (separate post), I found this Timetec RAM bundle that was cheap and meeting my laptop's RAM specs. With just $16 bucks, I was able to get machine to run even better and ready to take more workloads.


References


Comments

Popular posts from this blog

Quick Tips: Salesforce default Images

Well, I'm sure a lot of you still rely on using out of the box salesforce images for displaying quick icons within formula fields or even using them within your Visualforce pages. Lately, I realized that a lot of earlier resources are no longer accessible, so I tried to quickly extract all images from Salesforce CSS files and provide a quick reference here. Please note, I've referenced all images from SF servers directly, so if anything changes, the image should stop rendering here. As these images are completely controlled by Salesforce, and in case they change anything, it might lead to image not being accessible. Image path Image /img/samples/flag_green.gif /img/samples/flag_green.gif /img/samples/flag_red.gif /img/samples/color_red.gif /img/samples/color_yellow.gif /img/samples/color_green.gif /img/samples/light_green.gif /img/samples/light_yellow.gif /img/samples/light_red.gif /img/samples/stars_100.gif /img/samples/stars_200.gif /img/samples/stars_300.

Lightning: Generate PDF from Lightning components with in-memory data

I'm sure as everyone is diving into lightning components development, they are getting acquainted with the nuances of the Lightning components framework. As well as, its current limitations. Being a new framework, this is bound to happen. Although we have our users still using salesforce classic, we have started using lightning components framework our primary development platform and Visualforce is considered primarily for rendering lightning components within Classic Service console. Recently, while re-architecting a critical module, we encountered a problem wherein we needed to generate PDF from lightning components. Now, being Javascript intensive framework, it has limited room for such features (may be included in future roadmap). As of now, there is no native feature within the lightning framework to do so (at least I didn't find anything). Common Scenario - Create Visualforce page to retrieve data and generate PDF For scenarios where the data exist within Sa

Quick Tips: Setup SFDX Manually without Admin access

We all have faced challenges while working in different enterprise environments, where there may be lot of controls/ checks/ red-tape to get by. In such situations, getting access to simple tools (even git) can take lot of time. Note: This tutorial is to be followed at your own risk, as it may not be complaint to your organization's IT policies. What is SFDX? SFDX is a command line utility for managing salesforce builds/ deployments. Being command line, it can be easily embedded to automation chains, to help build fully automated build and deployment processes. To get started, refer  https://trailhead.salesforce.com/en/content/learn/trails/sfdx_get_started Setup SFDX on Windows machine without admin access As you may have already realized, SFDX installation needs admin access to one's machine. Which may be a luxury a lot of developers may not have. So, i tried to provide a step-by-step guide to setup SFDX on your computer without any admin access Steps: Note: